Suture removal is a critical step in wound care, ensuring proper healing and minimizing complications. It involves carefully removing sutures once the wound has sufficiently healed.
1.1 Overview of Suture Removal
Suture removal is a clean, non-invasive procedure involving the careful elimination of sutures once a wound has healed adequately. It typically uses sterile forceps and scissors, cutting the suture near the skin and gently pulling it out. This process minimizes tissue trauma and prevents infection, ensuring proper wound closure and patient comfort.
1.2 Importance of Proper Technique
Proper suture removal technique is vital to prevent complications such as infection or wound dehiscence. Using sterile forceps and scissors ensures cleanliness, while gentle handling minimizes tissue trauma. Correct assessment of wound healing before removal is essential to avoid premature suture elimination, which could reopen the wound. This careful approach promotes optimal recovery and reduces the risk of adverse outcomes for patients.

Factors Determining Suture Removal
Suture removal timing depends on factors like suture material, wound location, healing progress, patient-specific considerations, and surgeon instructions, ensuring proper healing and minimizing complications.
2.1 Suture Material and Type
The type of suture material, whether absorbable or non-absorbable, significantly influences removal timing. Absorbable sutures dissolve over time, eliminating the need for removal, while non-absorbable sutures require manual extraction once healing is confirmed. Different materials have varying dissolution rates and strengths, affecting how they are managed post-surgery.
2.2 Wound Location and Healing Progress
The location and healing progress of the wound are crucial in determining suture removal timing. Areas with higher vascularity, like the face, heal faster, requiring earlier removal, typically within 3-5 days. Slower-healing areas, such as the back, may need sutures for up to 14 days. Proper assessment ensures optimal wound strength before removal.
2.3 Patient-Specific Considerations
Patient-specific factors, such as medical history, comorbidities, and age, influence suture removal. Patients with compromised wound healing or diabetes may require extended suture retention. Additionally, individual tissue characteristics, such as vascularity, play a role in determining the optimal timing for suture removal to ensure proper healing and minimize complications. These factors help tailor the approach for each patient.

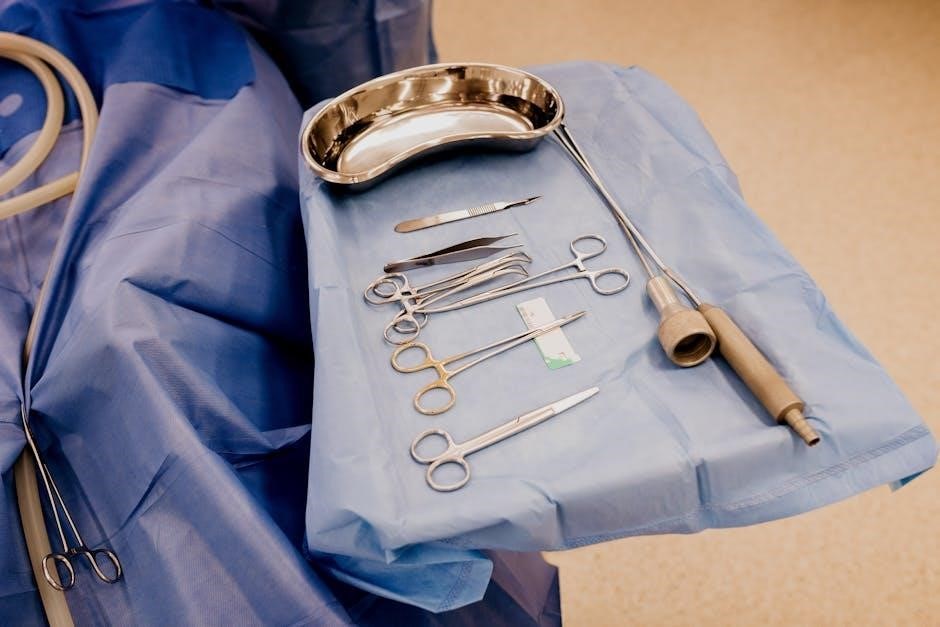
Supplies Needed for Suture Removal
- Forceps for securing sutures
- Scissors or suture cutters
- Antiseptic solution for cleaning
- Gloves and receptacle for waste
These tools ensure safe and effective suture removal, promoting wound hygiene and patient safety.
3.1 Essential Instruments and Materials
Key supplies include sterile forceps for gripping sutures, sharp scissors or suture cutters to snip them, and antiseptic wipes to clean the area. Gloves are worn to maintain hygiene, and a waste container is needed for discarded sutures. These tools are crucial for a safe and efficient procedure, minimizing infection risks and ensuring proper technique.
3.2 Preparation of the Procedure Area
The procedure area should be clean and well-lit, with all necessary supplies organized. A comfortable patient position is ensured to facilitate easy access to the sutures. The surface is disinfected with sanitizing wipes or a solution of warm water and detergent, and appropriate waste disposal is arranged to maintain a sterile environment and prevent contamination.
Pre-Procedure Steps
Patient positioning and comfort are prioritized to ensure easy access to sutures. Proper hand hygiene is performed, and the wound is assessed for healing progress and signs of complications.
4.1 Patient Positioning and Comfort
Proper positioning ensures easy access to sutures, minimizing discomfort. Patients are placed in a comfortable position, with the wound area exposed. Supports may be used to maintain alignment and reduce movement. Ensuring patient relaxation is key to a smooth procedure, reducing anxiety and promoting cooperation during suture removal.
4.2 Hand Hygiene and Aseptic Technique
Hand hygiene is essential before suture removal to prevent infection. Use alcohol-based hand rub or soap and water. Wear gloves to maintain asepsis. Clean the wound with antiseptic solution to reduce microbial load. Sterile forceps and scissors should be used to handle sutures, ensuring a clean environment throughout the procedure.
4.4 Wound Assessment Before Removal
Before suture removal, assess the wound for signs of healing, such as closed edges and absence of discharge. Check for redness, swelling, or drainage, which may indicate infection. Ensure the wound is clean and dry. Document findings and patient tolerance. If healing is incomplete, delay removal or consult a provider for partial suture removal.
Step-by-Step Suture Removal Process
Secure the suture knot with forceps, cut it close to the skin, and gently pull the suture out. Repeat for all sutures, ensuring smooth removal.
5.1 Securing the Knot with Forceps
Using sterile forceps, grasp the suture knot firmly. Ensure a secure grip to avoid slippage. This step is crucial for maintaining control during removal, preventing breakage, and minimizing discomfort. Proper handling ensures the suture is removed intact, reducing the risk of residual material under the skin and promoting smooth wound closure.
5.2 Cutting and Removing Sutures
Using sterile scissors or suture cutters, snip the suture close to the skin surface, distal to the knot. Grasp the knotted end with forceps and gently pull the suture out in one continuous motion. Ensure the suture is removed completely to avoid leaving fragments under the skin. Handle the tissue with care to prevent irritation or trauma during removal.
5.3 Handling Tissue and Suture Ends
After cutting, hold the knotted end with forceps and pull the suture out smoothly. Avoid pulling too harshly to prevent tissue damage. Dispose of removed sutures in a biohazard container. Gently inspect the wound to ensure no suture fragments remain. Maintain asepsis throughout to minimize infection risks and promote healing. Handle tissue with care to avoid irritation or discomfort.
Special Considerations for Continuous Sutures
Continuous sutures require careful removal, often starting with every second suture to assess healing progress and prevent dehiscence, ensuring tissue integrity is maintained.
6.1 Removing Every Second Suture
Removing every second suture allows assessment of wound healing progress. If the wound edges separate, further removal is halted, and adhesive strips are applied. If healing is adequate, the remaining sutures are removed sequentially. This method ensures tissue integrity and minimizes the risk of dehiscence, promoting optimal wound closure and reducing potential complications.
6.2 Assessing Wound Healing During Removal
During suture removal, the wound is visually inspected for healing progress. The integrity of the tissue and approximation of edges are evaluated. Any signs of dehiscence, inflammation, or infection are noted. Patient-specific factors, such as comorbidities, are considered. The assessment determines if remaining sutures can be safely removed or if additional measures, like adhesive strips, are necessary to support healing.
Post-Procedure Care
After suture removal, the wound is observed for healing progress. The site is cleaned with antiseptic solution, and dressings are applied if needed. Patient education on wound care and follow-up instructions are provided to promote recovery and prevent complications.
7;1 Wound Observation and Documentation
After suture removal, the wound is carefully inspected for signs of healing, infection, or dehiscence. The healthcare provider documents the wound’s appearance, noting any irregularities or concerns. Accurate records are maintained, including the patient’s tolerance of the procedure and any post-removal instructions provided. This ensures continuity of care and proper follow-up.
7.2 Patient Education on Wound Care
Patient education is crucial for proper wound care post-suture removal. Emphasize keeping the wound clean, avoiding submersion in water, and using topical treatments as prescribed. Advise on signs of infection, such as redness or swelling, and when to seek medical attention. Provide clear instructions for dressing changes and stress the importance of follow-up appointments to ensure proper healing and prevent complications.
Potential Complications and Management
Potential complications include infection, wound dehiscence, or retained sutures. Immediate actions involve assessing wound healing, applying adhesive strips if edges separate, and notifying the healthcare provider promptly.
8.1 Signs of Infection or Dehiscence
Signs of infection include redness, swelling, warmth, or purulent discharge around the wound. Dehiscence is marked by wound edges separating. If observed, discontinue suture removal, apply adhesive strips, and notify the provider immediately to prevent further complications and ensure proper wound management.
8.2 Immediate Actions for Complications
If complications arise, such as infection or dehiscence, halt the procedure immediately. Secure the wound with adhesive strips and notify the healthcare provider. Cleansing the area with an antiseptic solution may be necessary. Document the incident and patient response. Immediate consultation with a healthcare professional is crucial to address complications effectively and prevent further issues.
Documentation and Follow-Up
Accurate documentation of the suture removal procedure, including wound healing status and patient tolerance, is essential. Schedule follow-up appointments to monitor recovery and address concerns. Provide clear post-care instructions to ensure proper wound management and patient safety.
9.1 Recording the Procedure and Outcomes
Record the suture removal procedure in the patient’s medical record, noting the date, sutures removed, and wound condition. Document any complications or unusual findings. This ensures continuity of care and provides a reference for future treatments. Accurate documentation also helps in tracking the patient’s healing progress and informs follow-up decisions.
9.2 Scheduling Follow-Up Appointments
Follow-up appointments are essential to monitor wound healing and address any concerns post-suture removal. Schedule these based on the patient’s healing progress and provider instructions. Ensure the patient understands the importance of attending follow-ups to prevent complications and confirm proper recovery. This step ensures continuous care and supports optimal outcomes for the patient.
Tips for Healthcare Providers
Ensure a clean environment, use proper hand hygiene, and employ sterile instruments. Patient comfort and clear communication are key. Regular training enhances technique and confidence.
10.1 Mastering the Technique
Mastering suture removal requires precision and patience. Ensure proper hand hygiene and use sterile forceps to grasp the knot. Cut sutures close to the skin and remove them in one continuous motion. Handle tissue gently to avoid irritation. Regular practice and training improve dexterity and confidence, ensuring safe and effective suture removal. Always prioritize patient comfort and clear communication.
10.2 Addressing Patient Anxiety
Addressing patient anxiety is crucial for a smooth suture removal experience. Clearly explain the procedure, use simple language, and address concerns to reduce fear. Ensure the environment is calm and comfortable. Encourage questions and provide reassurance. Empathetic communication helps build trust and minimizes anxiety, making the process easier for both patient and provider.
Suture removal is a vital procedure requiring precision and care. Proper technique ensures wound healing, minimizes complications, and promotes optimal patient outcomes, emphasizing the role of skilled healthcare providers.
11.1 Summary of Key Points
Suture removal is a precise process influenced by factors like suture material, wound healing, and patient-specific needs. Proper technique, using sterile forceps to grasp and cut sutures carefully, minimizes complications. Continuous sutures may require removing every second stitch to assess healing. Documentation and patient education are crucial for post-procedure care, ensuring optimal recovery and minimizing risks of infection or dehiscence.
11.2 Importance of Proper Suture Removal
Proper suture removal is essential to prevent tissue damage, infection, or dehiscence. It ensures wounds heal correctly, minimizing scarring and promoting recovery. Incorrect techniques can lead to complications, emphasizing the need for skilled healthcare providers to follow precise steps, maintaining patient safety and optimal outcomes throughout the healing process.
References and Further Reading
- Curr, N., & Fordham-Clarke, C. (2022); Wound Care and Suture Removal.
- World Health Organization. (2023). Guidelines on Suture Removal Techniques.
- PDF guides available online provide detailed step-by-step procedures and visual aids for healthcare professionals.
12;1 Recommended Resources
- World Health Organization guidelines on wound care and suture removal.
- Curr, N., & Fordham-Clarke, C. (2022). Wound Care and Suture Removal.
- Handbook of Basic Surgical Suturing for detailed techniques.
- Clinical demonstration guides for suture removal procedures.
- Online PDF resources provide step-by-step instructions and visual aids.
12.2 Accessing Detailed PDF Guides
Access comprehensive PDF guides on suture removal from reputable sources like the World Health Organization and medical journals. These resources offer detailed step-by-step instructions, illustrations, and best practices for healthcare professionals. Many guides are freely available online, providing in-depth information on suture materials, wound assessment, and post-removal care. Utilize these resources to ensure proficiency in suture removal techniques.