Cross stitch is a timeless embroidery craft creating beautiful designs with X-shaped stitches. It’s meditative, accessible, and perfect for crafting personalized gifts or home decor.
Materials Needed
To begin cross stitching, you’ll need a few essential supplies. A tapestry needle with a blunt end is ideal for stitching through fabric holes. Embroidery floss, available in cotton or silk, provides vibrant colors for your design. Choose fabric like Aida, Evenweave, or linen, depending on your skill level. A hoop or stitching frame keeps the fabric taut for easier stitching. Scissors are necessary for cutting floss, and a small pair is handy for precise cuts. Optional tools include a needle threader and magnifying glass for detail work. Finally, a cross stitch pattern or chart guides your design. These materials ensure you’re well-prepared to create beautiful embroidery pieces.
How to Read a Cross Stitch Pattern
A cross stitch pattern includes a chart with symbols, a color key, and grid lines. Each symbol represents a color, and the grid helps place stitches accurately.
Understanding the Chart
A cross stitch chart is a grid of squares, each representing a stitch on the fabric. Symbols or colors within the squares indicate the required thread color. Grid lines help align stitches, ensuring accuracy. The chart maps the design, guiding placement and sequence. Understanding the chart is key to replicating the pattern faithfully. Always refer back to the chart and color key to confirm details. Starting from the center ensures symmetry, as the chart often reflects the fabric’s layout. Keep the chart nearby and mark completed sections to track progress. This visual guide is essential for beginners and seasoned stitchers alike, making cross stitch accessible and enjoyable for all skill levels.
Color Key and Symbols
The color key is a crucial reference in cross stitch, matching symbols on the chart to specific thread colors. Each symbol corresponds to a particular shade, often labeled with a code or name. This ensures accurate color placement, maintaining the design’s integrity. Symbols may vary by brand, so always verify against the key provided. Some charts also include blank squares, indicating no stitch is needed. The color key helps manage thread usage, listing yardage for each color. Staying organized with threads and symbols avoids confusion. This system allows stitchers to focus on creativity, knowing each symbol guides them precisely. It’s a reliable tool for achieving professional-looking results, even for beginners.
Starting Your Project
Starting your cross stitch project involves finding the center and setting up your hoop or frame. This ensures proper tension and easy stitching for a neat design.
Finding the Center
Finding the center of your fabric is essential for ensuring your design is evenly aligned. To locate the center, fold the fabric in half both horizontally and vertically. The point where the folds intersect is the center. Pin or mark this spot with a small dot to guide your stitching. Starting from the center prevents the design from being off-balance and ensures there’s enough fabric on all sides for the pattern to fit properly. This step is especially important for beginners, as it helps maintain symmetry and makes the stitching process more organized and enjoyable. Proper centering sets a solid foundation for your cross stitch project.
Setting Up Your Hoop or Frame
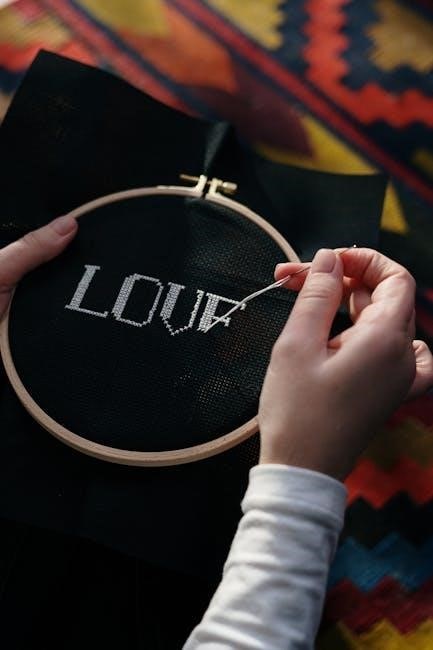
Setting up your hoop or frame is a crucial step in cross stitch. Start by cutting your fabric to the desired size, leaving extra around the edges for framing. Place the fabric in the hoop or frame, ensuring it is taut but not overly tight. Use the outer ring of the hoop to secure the fabric, tightening it evenly to avoid wrinkles. If using a frame, attach the fabric with clips or tape, ensuring it lies flat. Proper tension is key for even stitching. Once set, bring your needle up through the center hole to begin stitching. A well-set hoop or frame will keep your fabric steady, making stitching easier and more precise. This setup ensures your project remains organized and stress-free throughout the process.
Basic Cross Stitch Techniques
Mastering basic cross stitch techniques is essential. Start with the full cross stitch, then explore half and quarter stitches for intricate designs and texture.
Full Cross Stitch
The full cross stitch is the foundation of cross stitching. To create one, bring your needle up through the fabric at point A, then insert it diagonally across to point B, forming an “X.” This stitch is typically used to fill in larger areas of the design and is worked by completing one diagonal line before returning to create the cross. It’s essential to keep your tension even to ensure the fabric remains taut but not overly tight. Practice this stitch to achieve consistency, as it forms the basis for more complex patterns and designs in your cross stitch projects.
Half Stitch and Quarter Stitch
The half stitch and quarter stitch are essential techniques in cross stitching, often used for detail work, shading, and blending colors. A half stitch is created by completing only one diagonal of the full cross stitch, either from top-left to bottom-right or top-right to bottom-left. This stitch is ideal for outlining designs or adding subtle texture. The quarter stitch, a smaller variation, is worked in one-quarter of the space of a full cross stitch and is typically used for fine details or intricate patterns. Both stitches are worked similarly to the full cross stitch but cover less fabric, allowing for more precision. Maintaining even tension is crucial to ensure your stitches lie flat and look consistent. These stitches add versatility to your projects, enabling you to achieve complex and nuanced designs with ease.
Advanced Stitches
Advanced stitches elevate your cross stitch projects, adding complexity and depth. The three-quarter stitch, which fills three-quarters of a full cross stitch, is perfect for shading and blending colors. The backstitch is used for outlining and creating bold lines, while the French knot adds small, textured details. Long stitches span multiple grid squares, creating dynamic, flowing designs. These stitches are often combined with basic techniques to achieve intricate patterns. Proper tension is key to ensure advanced stitches lie smoothly. Experimenting with these stitches allows you to explore creative possibilities and push the boundaries of cross stitch artistry. With practice, advanced stitches will become essential tools in your stitching arsenal, enabling you to craft stunning, professional-looking designs.
Tips for Success
To ensure your cross stitch projects turn out beautifully, start by using good lighting and a comfortable workspace. Always begin stitching from the center of your design to maintain symmetry and avoid fabric waste. Use a hoop or frame to keep the fabric taut, reducing distortion and making stitching easier. Keep your fabric clean and dry, as oils from your hands can leave marks. Wash your hands before starting and iron your fabric after completion. Track your progress with a needle or magnet for your floss, and store loose threads neatly. Work in small sections and count carefully to avoid mistakes. Finally, take regular breaks to rest your eyes and hands, ensuring a enjoyable and stress-free stitching experience.

Finishing Touches
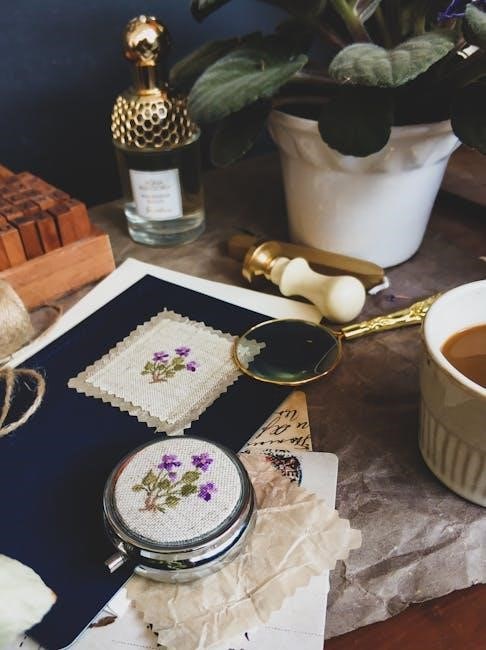
Once your cross stitch project is complete, a few finishing touches will make it look professional. Start by washing the stitched fabric in cold water to remove any oils or dirt. Gently pat it dry with a clean towel, avoiding wringing or twisting. Iron the fabric from the back while it’s slightly damp to flatten the stitches and even out the weave. Trim the excess fabric around the design, leaving a small border for framing or mounting. For pieces like pillows or ornaments, add a coordinating backing fabric. Secure edges with a needle and thread or use a hot glue gun for a quicker finish. These final steps ensure your cross stitch creation is neat, polished, and ready for display or gifting.

Troubleshooting Common Mistakes
Common mistakes in cross stitch often stem from misreading patterns or improper technique. One frequent error is miscounting stitches, leading to misplaced designs. To fix this, re-examine the chart and mark completed sections for clarity. Another issue is uneven tension, causing puckering or loose fabric. Adjust your stitching to keep consistent pressure, and use a hoop or frame for stability. Thread tails not secured properly can unravel work; always weave them in or tie knots. Color mismatches can occur if floss codes are misread; double-check the key before stitching. Finally, starting without finding the center may result in asymmetrical designs. Correct this by folding fabric to locate the midpoint and beginning there. Addressing these issues early ensures a smooth stitching experience and a flawless final piece.

Resources and Communities
Exploring cross stitch resources and communities can enhance your stitching journey. Online platforms like YouTube offer tutorials, while blogs and forums provide tips, patterns, and troubleshooting advice. Social media groups are vibrant hubs for sharing projects and inspiration. Websites like Etsy and specialized craft stores offer a wide range of patterns and materials. Local craft shops often host workshops, fostering connections with fellow stitchers. Engaging with these communities can help you stay motivated, learn new techniques, and gain confidence in your stitching abilities. Whether you’re a beginner or an advanced stitcher, these resources are invaluable for mastering the craft and staying updated on the latest trends in cross stitch.
Cross stitch is a rewarding craft that combines creativity with relaxation. Starting with basic supplies and understanding patterns, you can create beautiful designs. Techniques like full cross, half, and quarter stitches expand your skills. Advanced stitches and tips enhance your work. Troubleshooting common mistakes helps refine your craft. Finishing touches, like washing and framing, complete your projects. Engaging with resources and communities provides support and inspiration. Whether stitching for fun or gifting, cross stitch offers a meditative escape and a sense of accomplishment. With patience and practice, you’ll master this art, creating timeless pieces that reflect your personal style and creativity. Happy stitching!